Anti pinch sytem for DC motors
The objective of this project is to stop a motor when the Elastrolink sensor is pressed.
This project can be used for multiple application like :
– Automotive
– Home automation
– Anti-pinch
– Shock detection

Components
1 Arduino nano
1 Power Supply
1 Push Button
Supplies
Wires
Wire Striper Tool
1 Elastrolink Vein
1 ACS712
USB Cable
Cutting Pliers
2 NPN Transistors (2N2222)
2 5V Relays
Bakelite circuit board
Soldering Iron Station
Step 1 : Sensor Test

Connect the DATA wire (yellow) to A0, the red to 5V and the black one to GND
void setup() {
Serial.begin(9600);
}
Vois loop (){
Serial.println(analogRead(A0));
}
This sketch will allow you to check if your vein is working correctly.
When you’re not touching the vein it should print around 1024.
After that you can pinch the end of the vein and store the result then do the same thing with the beginning. Like that you will know the limit of your sensor.
Step 2 : Reel Circuit
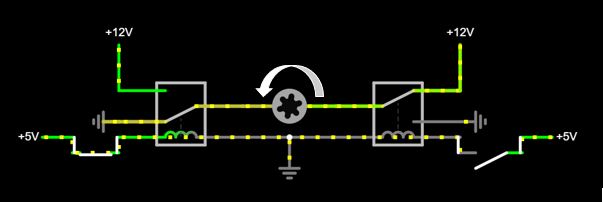
The objective of the circuit is to control a DC motor with an H-bridge and stop the motor when the sensor is pressed.
H bridge
Clockwise movement

Anticlockwise movement

Stop


The push button will be our ON/OFF switch, and each time we will press it we will change our state.
State 1 = OPENING
State 3 = CLOSING
State 0 and 2 = OFF
We will check the sensor only if we are in the state of opening or closing.
Algorithm

Step 3 : Control the transistors
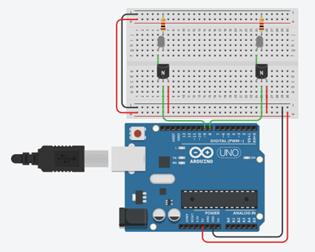
The two 2N2222 will allow us to separate the Arduino and the power circuits. It will prevent to overload the card.
For this step we will connect the transistor to pin 8 an 9 and add an two LEDs will show which transistor is conductive.

Program
int transistor1 = 8;
int transistor2 = 9;
void setup() {
Serial.begin(9600);
pinMode(transistor1,OUTPUT);
pinMode(transistor2,OUTPUT);
}
Void loop(){
/* — STATE 0 — */
digitalWrite(transistor1,LOW);
digitalWrite(transistor2,LOW);
Serial.println(“STATA 0”);
delay(1000);
/* — STATE 1 — */
digitalWrite(transistor1,HIGH);
digitalWrite(transistor2,LOW);
Serial.println(“STATA 1”);
delay(1000);
/* — STATE 2 — */
digitalWrite(transistor1,HIGH);
digitalWrite(transistor2,HIGH);
Serial.println(“STATA 2”);
delay(1000);
/* — STATE 3 — */
digitalWrite(transistor1,LOW);
digitalWrite(transistor2,HIGH);
Serial.println(“STATA 3”);
delay(1000);
}
Result
Step 3 : Add the relays
Now we are going to add the power supply to power up the motor
The relays are going to controlled by the two transistors and control the direction of rotation (opening or closing)

Program
int transistor1 = 8;
int transistor2 = 9;
void setup() {
Serial.begin(9600);
pinMode(transistor1,OUTPUT);
pinMode(transistor2,OUTPUT);
}
Void loop(){
/* — STATE 0 — */
digitalWrite(transistor1,LOW);
digitalWrite(transistor2,LOW);
Serial.println(“STATA 0”);
delay(1000);
/* — STATE 1 — */
digitalWrite(transistor1,HIGH);
digitalWrite(transistor2,LOW);
Serial.println(“STATA 1”);
delay(1000);
/* — STATE 2 — */
digitalWrite(transistor1,HIGH);
digitalWrite(transistor2,HIGH);
Serial.println(“STATA 2”);
delay(1000);
/* — STATE 3 — */
digitalWrite(transistor1,LOW);
digitalWrite(transistor2,HIGH);
Serial.println(“STATA 3”);
delay(1000);
}
Result
Step 4 : Add the push button and the Elastrolink sensor
Now we are going to add the push button to open and close the system
Then we are going to plug the Elastrolink vein to bring our anti pinch system

Program
#include <ACS7xx_Allegro.h>
ACS7XX_ALLEGRO mysensor(true, 0, 5.0, 0.1);
double courant;
int conso;
int pintransi1 = 8;
int pintransi2 = 9;
int buttonPin = 7;
int buttonPushCounter = 0;
int buttonState = 0;
int lastButtonState = 0;
void setup() {
Serial.begin(115200);
mysensor.begin();
pinMode(pintransi1, OUTPUT);
pinMode(pintransi2, OUTPUT);
pinMode(buttonPin, INPUT);
}
void loop() {
mysensor.instantCurrent(&courant);
conso = mysensor.getMovingAvgExp()/1000;
//Serial.println(mysensor.getMovingAvgExp());
Serial.println(analogRead(A3));
//Serial.println(conso);
buttonState = digitalRead(buttonPin);
if (buttonState != lastButtonState) {
if (buttonState == HIGH) {
delay(100);
buttonPushCounter++;
Serial.println(buttonPushCounter, DEC);
}
else {
buttonPushCounter = buttonPushCounter;
}
lastButtonState = buttonState;
}
if (buttonPushCounter > 3) {
buttonPushCounter = 0;
}
if (buttonPushCounter == 0 || buttonPushCounter == 2) {
digitalWrite(pintransi1, LOW);
digitalWrite(pintransi2, LOW);
//Serial.println(“STOP”);
} else if ( buttonPushCounter == 3 && analogRead(A3) > 130) {
digitalWrite(pintransi1, HIGH);
digitalWrite(pintransi2, LOW);
delay(50);
digitalWrite(pintransi1, LOW);
digitalWrite(pintransi2, LOW);
buttonPushCounter++;
Serial.println(“SECU”);
} else if (buttonPushCounter == 1) {
digitalWrite(pintransi1, HIGH);
digitalWrite(pintransi2, LOW);
Serial.println(“DESCENDRE”);
if(conso < -15){
buttonPushCounter++;
Serial.println(“Alerte Conso”);
Serial.println(conso);
}
} else if (buttonPushCounter == 3) {
digitalWrite(pintransi1, LOW);
digitalWrite(pintransi2, HIGH);
Serial.println(“MONTER”);
if(conso < -15){
buttonPushCounter++;
Serial.println(“Alerte Conso”);
Serial.println(conso);
}
}
}